


 中文简体
中文简体





Previous Post
You have a circular saw in your hand and a full sheet of melamine board on the sawhorses. Ten seconds after the blade touches the surface, you know whether the project is going to go smoothly. If the first pass produces a shower of white chips and a rough, frayed edge, the panel may still be usable, but it will not look good. The chipped edge will show in the final piece, and the exposed core will soak up moisture over time.
The conclusion can be stated directly: cutting melamine board with a circular saw without chipping is entirely possible, but it depends on four things—a sharp blade with the right tooth geometry, a shallow blade depth, a scored cut line, and full support under the panel. Each of these factors works by controlling the moment when the saw tooth breaks through the brittle melamine surface layer. Once you understand that mechanism, you can reproduce clean cuts on any similar laminated board.
Why Melamine Board Chips So Easily
Melamine board is not a single material. It is a composite panel made of a particleboard or MDF substrate covered by a thin layer of resin-impregnated decorative paper. The melamine facing gives the board its colour, grain, texture, and scratch resistance, but that facing is rigid and brittle. It has very little ability to flex or stretch. When a saw tooth enters the panel, the tooth pushes wood fibres out of its path. The substrate beneath the surface can compress and deflect, but the melamine layer cannot follow that movement. Instead, it cracks along the cut line, and the crack runs ahead of the saw tooth. This is why chips appear not only directly at the cut line but sometimes a few millimetres away from it.
The same mechanism causes chipping on the underside of the board. When the saw teeth complete their travel through the panel, they exit through the opposite face. If that face is not supported, the material near the exit point flexes downward. The melamine surface, being brittle, breaks off in a ragged line. In practice, the damage can occur on either face depending on the saw design, the blade direction, and the support underneath. For a handheld circular saw, the side that ends up with the worst tear-out is often the side you most wanted to protect.
This is not a defect of the board itself. It is the natural behaviour of a rigid coating bonded to a softer core. The key to a clean cut is to make sure the melamine layer is separated cleanly before the saw tooth applies pressure to it. If the surface layer is pre-cut or if the saw tooth is sharp enough to shear it in a single movement, the crack does not have the chance to run. That is the logic behind every technique in this article.
Start with the Right Blade
The blade is the single most important variable in the entire process. No amount of careful scoring or panel support will save you if the blade is dull, has the wrong tooth count, or uses a tooth grind that chips rather than shears. If you only make one change before your next cut, replace the general-purpose framing blade with a blade designed for melamine and other laminated panels.
Tooth count and tooth geometry
For a 7 1/4-inch circular saw, use a blade with at least 40 teeth, and preferably 48 to 60 teeth. The more teeth a blade has, the smaller the amount of material removed by each tooth. This reduces the force applied to the melamine facing and produces a smoother cut. A 24-tooth rip blade will tear the surface badly and is only suitable for cutting solid wood along the grain. A 40-tooth general-purpose blade is a minimum, but a 60-tooth blade will give you a visibly cleaner edge.
Tooth grind is just as important as tooth count. The two most effective grinds for melamine are Alternate Top Bevel (ATB) and Hybrid Alternate Top Bevel (HiATB). These teeth have a shearing action that slices the melamine surface rather than pushing it downward. Some blades are labelled as “melamine,” “laminate,” or “panel” blades; these usually use an ATB or Triple-Chip Grind (TCG) configuration. If you plan to cut melamine regularly, buy a dedicated blade and reserve it for laminated panels. Do not cut rough lumber with the same blade.
| Saw type | Blade diameter | Teeth | Tooth grind | Best for |
|---|---|---|---|---|
| 7 1/4-inch circular saw | 7 1/4 inches | 48–60 | ATB or HiATB | General sheet cutting |
| 6 1/2-inch circular saw | 6 1/2 inches | 40–52 | ATB | Lighter panels and narrow strips |
| Track saw with plunge base | 6 1/4 or 8 1/4 inches | 48–60 | ATB or TCG | Cleanest handheld cuts |
| Compact trim saw | 4 1/2 inches | 36–48 | ATB | Short crosscuts and small parts |
Blade diameter and arbor compatibility
Before buying a blade, check the arbor size of your saw. Most handheld saws in North America use a 5/8-inch arbor; many European models use a 20 mm arbor. The blade must sit flat on the arbor with no gap. If you use the wrong arbor size, the blade may wobble, which will produce a wider kerf and more chipping.
Blade diameter must also match the saw. Do not attempt to fit a 7 1/4-inch blade into a saw designed for a 6 1/2-inch blade. The blade will not fit under the guard, and the saw will be unsafe. A 6 1/2-inch saw with a 40-tooth ATB blade is capable of cutting melamine well, though the finish may not be quite as clean as a 7 1/4-inch blade with more teeth.
Sharpness and blade maintenance
Sharpness is non-negotiable. A dull blade with the correct tooth count will still chip melamine because the tips of the teeth no longer cut cleanly; they crush and push the surface. You can detect a dull blade by the edge quality, the amount of dust produced, and the smell of burning resin. If the plywood edge feels rough or you see fine white powder around the cut, stop and change the blade.
Carbide-tipped blades can be resharpened many times, but the sharpening must be done on a proper machine. Hand filing a carbide tip leaves an uneven edge and can ruin the tooth geometry. It is worth paying a professional sharpening service to maintain a good melamine blade. Also keep the blade body clean. Resin and pitch build-up on the teeth increases friction, slows the saw, and causes the blade to push against the material rather than slice it.
Set Blade Depth and Speed Correctly
Many woodworkers pull the blade depth adjustment to maximum before cutting a sheet of melamine. That is a mistake. A maximum-depth setting exposes too much blade below the panel, which adds friction and increases the chance of tear-out on the underside. The correct setting is just deep enough that the teeth extend 3 to 6 mm below the underside of the panel.
Why does shallow depth help? With a shallow kerf, fewer teeth are in contact with the material, which reduces resistance and vibration. More importantly, the geometric path of the tooth through the panel becomes steeper. The tooth pushes against the material in a more vertical direction, and that helps shear the melamine surface rather than lever it upward. On a table saw, a shallow depth setting has exactly the same effect. On a handheld circular saw, it also reduces the risk of kickback and makes the saw easier to guide along a straightedge.
To set the blade depth correctly, unplug the saw or remove the battery. Place the saw base on the edge of the panel, loosen the depth adjustment lever, and lower the rear of the base until the teeth just clear the underside of the panel. Then lift the base slightly? Actually, the correct sequence is: hold the saw against the panel, adjust the depth so the teeth protrude 3–6 mm, and lock the lever. If the teeth protrude less than 3 mm, the blade may not fully exit the material and will burn the edge. If they protrude more than 6 mm, you are creating unnecessary tear-out risk.
Speed control is also part of the formula. Start the saw and let the blade reach full RPM before you enter the material. Push the saw forward at a steady, deliberate pace. Do not force it; the weight of the saw plus a light forward push is enough. If the motor slows down audibly, you are feeding too fast. If you produce a lot of fine dust and a burning smell, you are feeding too slowly. The ideal feed rate produces a consistent stream of sawdust and a smooth, cool edge.
For variable-speed saws, run the blade at the highest RPM setting. The speed of the teeth relative to the feed rate is what determines the finish. At high RPM and a moderate feed rate, each tooth takes a thin, clean bite. At low RPM with a fast feed, each tooth takes a heavy bite and tends to tear the surface.
Score the Cut Line Before the Main Cut
Scoring is the most direct way to prevent the melamine surface from chipping. A sharp utility knife can cut through the decorative layer in two or three passes. Once the surface film is separated, the saw tooth no longer has to break that brittle layer. The blade removes the substrate below it, and the crack has no place to start.
Begin by clamping the panel to a stable surface with the finished face up. Mark the cut line with a pencil or a chalk line. Place a straightedge along the line and press the knife firmly into the surface. Make one pass along the full length of the cut. You should feel the blade cut through the top layer. Repeat the pass two or three times, using moderate pressure and a fresh blade in the knife. The goal is to cut roughly 0.5 to 1 mm into the decorative layer, not through the entire board.
If the melamine board is finished on both sides, you can score both faces. Mark the line on the top, score it, then carefully turn the panel over and score the same line on the back. Use the straightedge again to keep the two scores aligned. When you run the saw, the teeth will enter through the top score and exit through the bottom score, and both surface layers will already be cut. This is especially helpful when you are cutting a panel that will be visible from both sides, such as a freestanding partition or a shelf that is not covered by edge banding.
Scoring works even better when combined with masking tape. Lay a strip of low-tack painter’s tape along the cut line, mark the line on the tape, and score through the tape and into the melamine. The tape holds the fragments of the surface together at the edge of the kerf. After the cut, remove the tape slowly and carefully. If a tiny chip has formed, the tape will often hold it in place so you can sand or glue it back? Actually, once the chip is separated, the tape may keep it in position until you can apply edge banding. Still, the main benefit of tape is that it prevents the surface from lifting in the first place.
Use a Rigid Straightedge or Cutting Guide
A circular saw is not intended to be pushed across a panel freehand. The base plate shifts, the blade wanders, and the cut line drifts. On melamine board, a wandering cut is not just a cosmetic problem. As the blade changes its angle relative to the surface, it places uneven pressure on the melamine layer and increases chipping. A rigid straightedge solves this by keeping the saw on a fixed path.
You can buy a commercially made guide rail or track saw rail, or you can make your own straightedge from a piece of 12 mm or 18 mm plywood. The straightedge must be long enough to cover the entire cut, and it must be straight. If you are making your own, buy a factory-edged strip of MDF or plywood and verify that it is straight by cutting a thin strip of paper along the edge? Actually, a simpler method is to use a long aluminium ruler or a piece of 6061 aluminium bar stock. The important thing is that the guide does not flex when you clamp it.
Positioning the guide requires measuring the offset between the saw blade and the edge of the saw base. Place the saw on a scrap piece of board and lower the blade. Measure from the edge of the blade to the edge of the saw base that will slide against the guide. For example, if the left side of the base is 35 mm away from the blade, clamp the guide 35 mm away from the desired cut line. Always make a test cut before cutting your real panel, because the offset can vary between saws and even between bases if a zero-clearance plate is attached.
Clamp the guide at both ends and, if possible, at the middle. For a long panel, use at least three clamps. The clamps should be tight enough to prevent movement but not so tight that they bow the straightedge. Once the guide is secure, run the saw along it slowly. Keep the left edge of the base pressed firmly against the guide for the entire length of the cut. At the end of the cut, be especially careful not to let the base pull away from the guide.
If you are using a track saw, the track serves as both straightedge and anti-splinter device. The anti-splinter strip on the track presses against the surface and supports it right next to the kerf. This produces a noticeably cleaner edge than a free-floating circular saw base. If you own a track saw, use it for melamine; if you own only a regular circular saw, a plywood straightedge is perfectly adequate.
Support the Panel on Both Sides of the Cut
Large melamine sheets flex. A 2440 × 1220 mm sheet of 18 mm melamine board weighs around 40 kg depending on the substrate, and if you place it across two sawhorses, the outer ends will sag. That sag is the direct cause of many of the chipped edges you see on job sites. When the sheet flexes, the melamine face on one side goes into tension and cracks even before the blade reaches it.
The solution is to support the panel so that both sides of the cut are as flat and stable as possible. Use at least two sawhorses and place a sheet of rigid foam insulation or a scrap piece of plywood across them as a deck. The deck should be large enough to fully support the panel along its entire length. The cut line should sit slightly beyond the edge of the deck, but the offcut side must still be supported. If the offcut side is hanging in the air, the panel will bend as the kerf is completed, and the underside will tear out.
A very effective approach is to cut on a sacrificial surface. Place a full sheet of inexpensive particleboard or plywood under the melamine panel. The saw blade will cut a shallow kerf into the sacrificial board, which does two things. First, it supports the lower face of the melamine right along the cut line. Second, it prevents the last fibre from being pushed outward when the tooth exits the panel. Professional panel saws use exactly this principle with a backing material under the workpiece.
If you are cutting a long strip from a full sheet, you also need a second person to help manage the panel. One person can push the saw while the other supports the offcut side. The helper should never stand in the path of the saw or attempt to catch a falling offcut. Instead, the helper should keep the offcut side level and let the saw finish the cut before moving that piece away.
Clamping pressure matters as well. Clamp the panel to the supports at each end of the cut. This prevents the panel from sliding as you push the saw. But avoid clamping in the middle of the cut line, because a clamp located there will interfere with the saw base. If you need extra stability in the middle, use a clamp that sits below the panel and presses up from underneath, such as a parallel clamp or a squeeze clamp that reaches under the support deck.
Control the Feed and Manage the Cut Zone
Even with the right blade, proper depth, and a straightedge, the quality of the cut depends on how you move the saw. The most common error is to stop the saw mid-cut to reposition your hand or check the line. A stopped blade dwells in the kerf, the teeth scrape the melamine surface, and the edge burns. The second most common error is to feed the saw so quickly that it labours and begins to bounce.
Begin each cut by positioning the base on the panel with the blade just behind the start line. Start the motor and wait for full RPM. Then advance the saw in one smooth, continuous motion. The feed speed should be consistent from the moment the blade enters the material until it exits the far edge. If the saw wants to pull itself forward or slow down, adjust your pressure immediately. A slight hum from the motor is normal; a deep bogged-down sound means you need to ease off.
If you hear cracking during the cut, stop? Actually, stopping is risky because the moving blade can create a wider kerf. A better approach is to slow your feed until the cracking stops. In many cases, the cracking sound is the surface layer fracturing just ahead of the blade. Slowing the feed gives the tooth time to shear the material rather than hammer it.
For extra control, you can build a zero-clearance base for your circular saw. A zero-clearance base is a thin, flat plate of acrylic or 3 mm hardboard attached to the underside of the saw base. Because it has a tight kerf cut precisely to the blade, there is no open gap around the blade. The plate supports the surface right next to the teeth and prevents the board from flexing into the empty gap under the base. To make one, trace the outline of the saw base onto a sheet of acrylic or hardboard, cut it out, attach it to the saw base with double-sided tape or small screws, then plunge the saw blade through the plate to create the kerf. The process takes about fifteen minutes and noticeably improves cut quality.
Masking tape can be added at the cut zone. Apply a strip of 50 mm wide painter’s tape directly over the cut line. The blade cuts through the tape, and the tape supports the surface both visually and physically. It is a simple low-tech solution, but it works well when the blade and feed settings are already correct.
Finally, remember that the last few centimetres of a cut are the highest risk zone. When the saw is near the far edge, the offcut side is often weakest. Keep the saw moving until the blade is completely out of the panel. If you stop just before the end, the slight change in angle as you restart will leave a step or chip. Let the saw finish its cut and only then release the trigger.
After the Cut: Clean the Edge and Protect It
A clean cut is not the end of the job. The edge of a melamine board is raw substrate, and if it is left unprotected, it will absorb moisture. Over time, a wet edge can swell, causing the melamine facing to lift. Even in a dry indoor environment, a dusty rough edge looks unfinished. A few minutes of cleaning and sealing will extend the life of the panel and improve the appearance of the finished piece.
Start by removing any loose dust and small fragments from the cut edge. Use a dry cloth or a soft brush. If the edge shows a fine fuzz or a slight roughness, sand it lightly with 180-grit sandpaper. Use a sanding block and sand in one direction across the edge, not back and forth. Do not press hard; you only want to remove the loose fibres, not recess the substrate below the melamine face. Over-sanding will leave the edge slightly hollow, and when you apply edge banding, it will not sit flush with the surface.
For visible edges, melamine edge banding is the standard professional solution. It is available in rolls that match the colour and texture of the board. You can apply it with a household iron set to a medium temperature. Lay the banding over the edge, press with the iron for a few seconds, then trim the excess with a flush-trim router bit or a sharp knife. If you are banding both edges of a panel, leave the banding slightly proud and then sand it flush after installation. A neat banding job hides the raw edge completely and gives the panel a factory-made look.
If you do not want to apply edge banding, seal the raw edge with a thin coat of wood glue, PVA adhesive, or a dedicated edge sealer. A light application of solvent-based sanding sealer also works. The sealer will soak into the substrate and harden it, preventing water from entering. For decorative wall panels where the edge is often hidden behind a profile or a mount, this step is even quicker but still worth doing.
Textured melamine panels present a slightly different situation. If the surface has a deep embossed texture, the edge will have high and low spots that correspond to the pattern. Edge banding can bridge across the low areas and leave gaps. Before committing to edge banding on a textured panel, test it on a scrap piece. If the banding does not adhere well, you have two options: use a colour-matched acrylic edge filler, or design the job so the cut edge is placed in a joint or behind a trim. In many interior projects, the cut edges of textured panels are intentionally hidden, and the visible face is the only part that needs to be perfect.
For example, a fire-rock textured panel with a 3D surface can be cut cleanly with the technique described in this article, but you should inspect the edge carefully after each cut. The strong surface topography can catch the saw blade differently at each point along the kerf. A slower feed and a sharp blade are essential if you are working with such a panel.
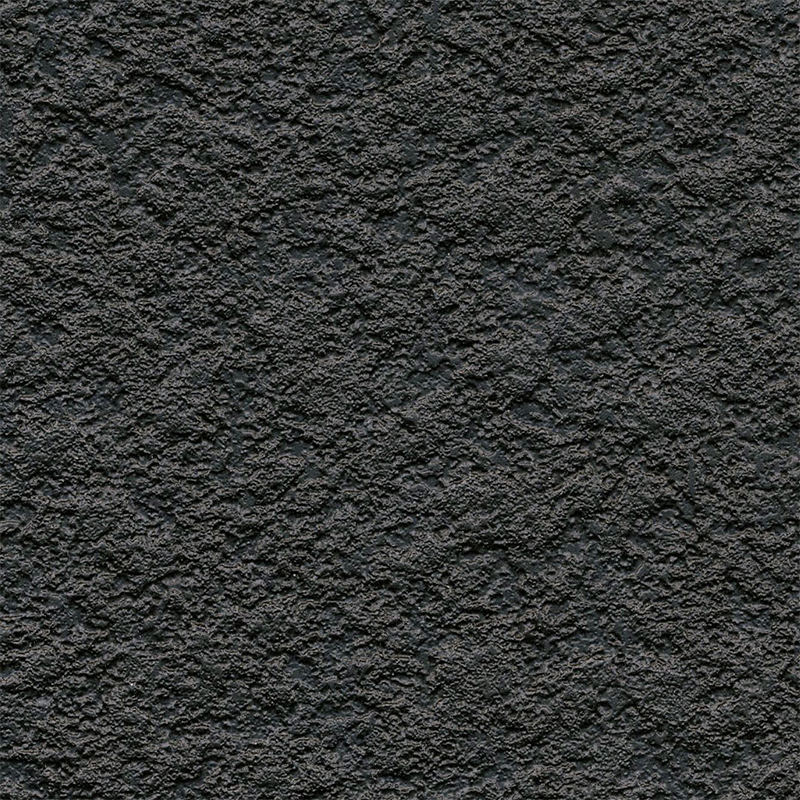 SS04 Rock Texture Panel with 3D Deep Embossed SurfaceThis melamine-faced panel features a deep 3D rock texture that mimics natural stone. Its uneven topography demands careful cutting attention, making it a practical choice for decorative interiors where tactile depth and edge quality matter.View Product →
The Panel Itself Matters: Choosing a Board That Cuts Cleanly
No blade or technique can turn a poorly made melamine board into a precision product. The density and internal bond of the substrate, the quality of the melamine-impregnated paper, and the adhesion between the surface layer and the core all affect how the edge behaves during cutting. A board with a loose, coarse particleboard core will chip even when you use a 60-tooth ATB blade at the correct depth. A board with a dense, well-bonded core will cut cleanly even in less than ideal conditions.
When you buy melamine board, it is worth asking about the substrate. In Europe, particleboard is classified as P2, P3, P5 and so on depending on its moisture resistance and mechanical performance. P2 is the typical grade for indoor furniture. P3 is more resistant to moisture and is used in humid rooms. For areas near water, an HMR (high moisture resistant) board is a better choice. MDF-based melamine board is denser and gives a smoother cut edge than particleboard, but it is heavier and hard on blades. Plywood-based melamine board is strong and dimensionally stable, but the edge will show the ply structure, which many people find unattractive on a visible joint. LSB (large strand board) is sometimes used as a core material because it has a more uniform density than conventional particleboard.
| Substrate | Edge quality | Cutting behaviour | Typical use |
|---|---|---|---|
| Particleboard | Good if the core is fine and uniform | Can chip if the internal bond is weak | Cabinets, shelving, furniture |
| MDF | Smooth, tight, and clean | Dulls blades faster, heavier, absorbs water | Doors, panels, painted or veneered surfaces |
| Plywood | Edge shows plies, can tear at the grain | Strong and stable, saw must be sharp | Heavy-duty furniture and structural panels |
| LSB | Uniform density, good internal bond | Generally cuts cleanly | Decorative panels where core stability matters |
The surface finish of the melamine layer matters too. A high-gloss surface reveals every tiny chip and scratch, so a clean cut is absolutely essential. A wood-grain or textile texture hides minor defects well, but the depth of the texture introduces another variable. If the texture is deeply embossed, the blade will cut through thicker and thinner areas of the decorative layer. A sharp blade will still make a clean edge, but you may not get the same razor-sharp line that you would on a smooth gloss board. If your project has many textured panels, run a practice cut on a scrap piece before you cut the finished material.
One of the best pre-purchase checks is a simple test cut. Order sample panels from your supplier, use the saw set-up you plan to use in production, and cut each sample. Compare the edges under a strong light. Look for chip size, fibre lift, and how much edge sanding is needed. This test takes less than an hour and can save you from discovering poor edge quality after you have cut an entire kitchen run.
If you are selecting a panel for a visible furniture or wall application, our guidelines for choosing decorative panels explain the practical differences between surface types and substrate options in more detail. The same article also covers the expectations you should have for a board that is intended to be machined cleanly.
guidelines for choosing decorative panels read more.
When the board has a three-dimensionally embossed surface, the manufacturing process matters as well. The deep texture is produced by hydraulic presses that compress the surface into the substrate. This creates a slight residual stress in the panel. When you cut it, the stress can release and cause the edge to curl or chip. You can reduce this effect by using a sharp blade, a slow feed, and a supported cut. A more detailed explanation of how deep embossed panels are manufactured is available on our technology page.
our technology page describes the process.
As an example, a nanmu straight-grain 3D wall panel behaves differently from a flat melamine panel because the grain is physically pressed into the surface. The technique and blade settings are the same, but the finished edge will show the texture in a way that mirrors the pattern.
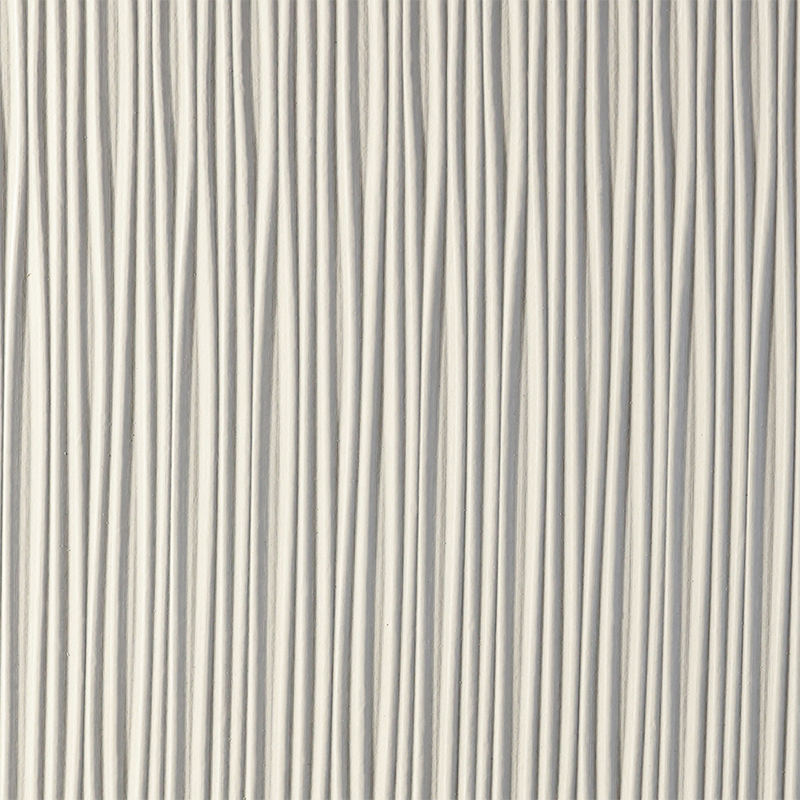 ZS06 Wave Texture Panel with Embossed 3D GrainOffering soft wave-like 3D embossing that replicates carved wood without the cost and maintenance, this panel suits projects needing consistent clean cuts across textured surfaces, as the physically pressed grain affects edge finish.View Product →
Step-by-Step Workflow for a Clean Melamine Cut
If you follow the steps below, you will get a consistent result on every cut. The entire workflow takes only a few minutes of set-up time per panel, and the difference in edge quality is significant.
- Choose a sharp melamine blade with 48–60 teeth and ATB or TCG grind.
- Set the blade depth so the teeth extend 3–6 mm below the panel.
- Mark the cut line and clamp a rigid straightedge offset by the measured base distance.
- Score the line two or three times with a sharp utility knife.
- Apply painter’s tape over the line, if desired.
- Support the full panel on sawhorses or foam board, with sacrificial backing underneath.
- Clamp the panel to the supports at both ends of the cut.
- Start the saw, wait for full RPM, and push forward steadily.
- Do not stop mid-cut; keep moving until the blade exits the far edge.
- Deburr the edge with fine sandpaper or a file.
- Seal the edge with edge banding, PVA glue, or a sealer.
Even with these steps, problems can still appear. The table below lists the most common issues and their causes. Use it as a simple diagnostic when a cut does not come out as you expected.
| Problem | Likely cause | Solution |
|---|---|---|
| Heavy chipping on the top face | Dull blade, wrong grind, missing score cut | Replace the blade, use ATB or TCG, score the line |
| Chipping on the underside | Blade exiting unsupported, no sacrificial backing | Use a backing panel and support the offcut side |
| Burning smell or brown edges | Feed too slow, blade dull, or too much blade exposed | Increase feed speed, sharpen the blade, reduce depth |
| Saw drifts away from the line | Guide not secure, or base not pressed against the guide | Re-clamp the guide, use more clamps, keep the base in contact |
| Rough, fuzzy edge | Low-density substrate or very dull blade | Choose a denser core material and use a fresh blade |
| Crack at the end of the cut | Offcut side drops before the cut is complete | Support the offcut side with another sawhorse or helper |
| Wavy surface near the cut | Panel flexing due to insufficient support | Place the panel on a flat deck or foam board |
These mistakes are common on job sites, and they are all preventable. One of the most frequently overlooked details is the speed of the saw. A variable-speed saw running at half speed will tear melamine even if everything else is correct. Always set the saw to its maximum speed setting before cutting laminate-faced panels. If the saw has a soft-start feature, wait for the motor to spool up before engaging the material.
Another frequent mistake is using the same blade for melamine and for solid wood or plywood without checking the edge. A blade that has cut a few sheets of plywood can develop micro-chips on its carbide tips that are invisible to the naked eye but show up as a jagged cut on melamine. A dedicated blade is the only reliable way to maintain a high-quality edge across a production run.
Application Notes: Shelves, Cabinet Parts, and Decorative Wall Panels
The same technique applies to different types of projects, but each project has small adjustments that improve the result. Cutting melamine board for shelves, cabinets, and wall panels is not fundamentally different, but the priorities are not always the same.
Shelving and storage
Shelf boards are usually cut to length and then edge-banded on the two long edges. The short edges, however, are often left exposed. This is where chipping is most visible. If you are cutting a batch of identical shelves, clamp a stop block to your straightedge. The stop block ensures every shelf is exactly the same length and also prevents the saw from continuing past the cut line. A second person can support the offcut end so it does not lean against the moving blade. For shelving, the substrate quality matters because a shelf takes load; a board with a weak internal bond can break out around a screw hole later, even if the cut edge looks clean.
Cabinet components
Cabinet parts are usually cut from melamine faced particleboard and then assembled with shelf pins, glue, and screws. The cut edges are often banded, but edge banding cannot fix a severely chipped edge. The banding will follow the contour of the chip-out and leave a visible void. Therefore, the goal is to produce a cut edge that is smooth enough to accept banding without filler. The best practice is to cut the panel face down if your saw design puts the clean side on the base. But as noted earlier, the orientation depends on the specific saw. Make a test cut and inspect both faces. Once you know which face is clean, use a sharpie to mark the saw base with an arrow indicating the clean face. That small step saves time when you are cutting many pieces.
For drawer sides and interior components that will not be visible, chipping may be acceptable as long as the structural integrity is not compromised. A small chip in a drawer bottom is harmless, but a chip in a visible door frame is not. If you are cutting a cabinet run, separate the visible parts from the hidden parts and take extra care on the visible ones.
Decorative wall panels
Decorative wall panels are a special case because the decorative surface is the entire reason the product exists. A chip on a cabinet side might be hidden; a chip on a wall panel is obvious. For panels with a 3D texture, the approach is the same but the visual tolerance is lower. Cut slowly, use the sharpest blade you own, and consider cutting on the back side if the front texture is deep. A track saw with an anti-splinter rail is the best tool for this because the rail presses the texture down and supports it during the cut.
If you are working with a leather-textured decorative panel, the surface has a soft-looking but rigid artificial texture. This texture can dull blades slightly faster than a smooth gloss board because the resin content is high. Test a scrap piece first, then plan your cuts so any minor edge defects are hidden by joints or trims. A leather-textured panel is often used in wardrobes and headboard walls; the cut edges are usually covered by aluminium profiles or routed grooves, which reduces the need for perfect edges.
 PZ02 Leather Texture Panel with Light Luxury FinishA melamine panel embossed with a leather-like texture that combines refined appearance with practical durability. Its high resin surface may dull blades faster, so test cuts are advised when planning precise edgework.View Product →
Safety Considerations
Cutting melamine board is a safe operation if you respect the saw and the material. The main hazards are dust, noise, blade contact, and kickback. Melamine dust is fine and can irritate the eyes, nose, and throat. Wearing an FFP2 or N95 dust mask is strongly recommended, especially if you are cutting many panels in a closed space. A shop vacuum or dust extractor connected to the saw port is even better. If your saw has no dust port, place a vacuum hose near the cut line and keep the airflow moving.
Wear safety glasses at all times. The nose of a circular saw can throw small pieces of resin and board at high speed. Hearing protection is also wise because a circular saw cutting melamine produces a high-pitched sound that quickly fatigues the ears.
Kickback is the most serious risk. If the blade binds in the kerf, the motor will try to push the saw backward toward the operator. To reduce this risk, use a sharp blade, set a shallow depth, feed at a steady speed, and keep the saw straight in the cut. Never force the saw. If the saw slows down, ease off the pressure. Also be aware of the offcut side: when the last few millimetres of material break away, the panel can shift and pinch the blade. A helper who supports the offcut side prevents this pinching action.
Never put your hand under the panel while cutting. The blade extends below the work surface, and it is easy to forget that the underside is the danger zone. Always wait until the blade has completely stopped before reaching underneath. Large sheets of melamine are heavy; use a panel lift or ask for help when moving them onto the sawhorses. If the panel falls while you are cutting, it can also push the saw out of your grip. Wear steel-toed shoes if you handle full sheets regularly.
Final Thoughts
Cutting melamine board with a circular saw is a skill that improves with practice and careful set-up. The board chips because its decorative surface layer is rigid and brittle. To prevent that, you need to prepare the cut before the saw arrives: choose a sharp blade with many teeth, set the depth shallow, score the line, clamp a straightedge, and support the panel thoroughly. With these steps, a hand-held circular saw can produce an edge that is close to table-saw quality.
Do not ignore the quality of the board itself. A dense, well-bonded substrate and a firmly fixed melamine facing will cut much more cleanly than a cheap board. If you are buying panels in quantity, test a sample before you commit. And once your technique is dialled in, write it down. The exact blade model, blade depth, feed speed, and guide offset that works on your saw is a recipe you can reuse for years. Every time you cut a sheet of melamine, the same principles apply, and the result will be a clean, professional edge that you can assemble or install without embarrassment.





